Isoglide Spring
Steps and Procedures
Surgeon
BEFORE BONDING THE ISOGLIDE SPRING, PLEASE DISCUSS THE CASE WITH THE ORTHODONTIST TO DETERMINE WHERE THE SPRING CLAMP SHOULD BE ATTACHED TO GIVE THE DESIRED VECTOR OF FORCE.
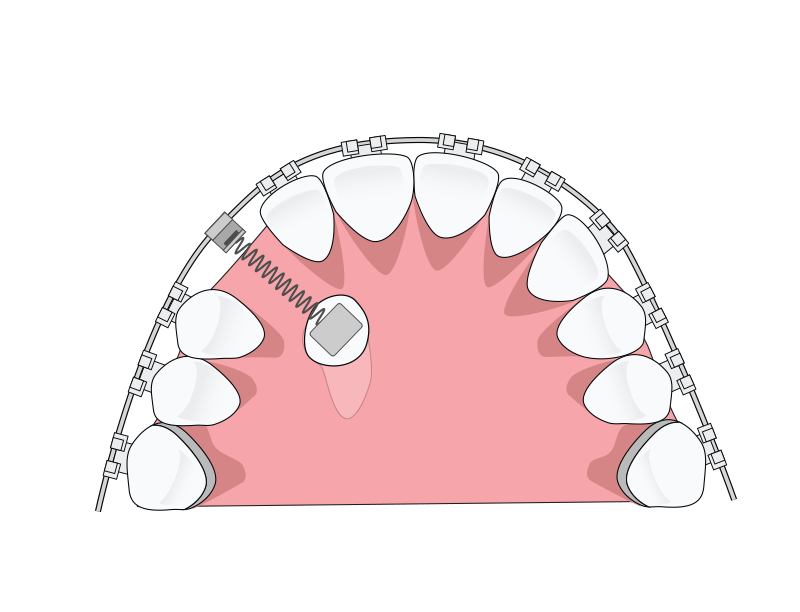
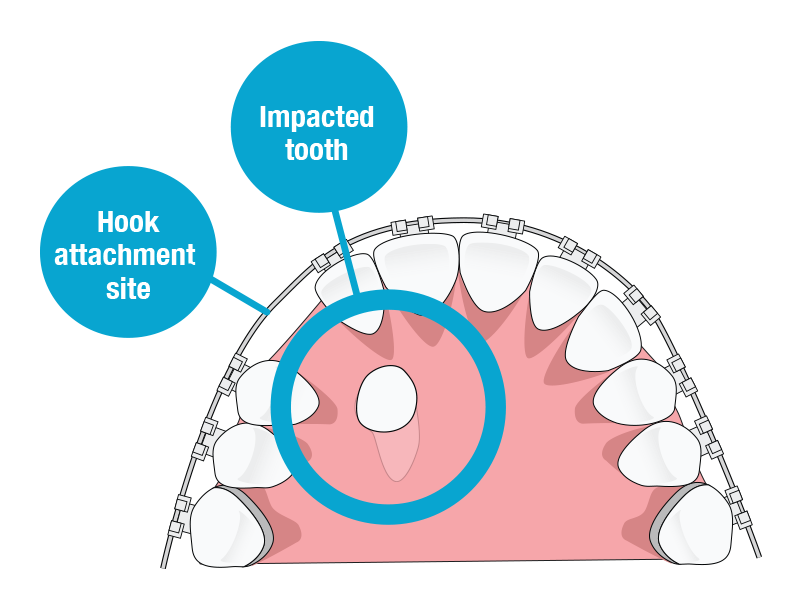
Step 1 – Follow your normal procedure for exposing the impacted tooth, exposing as much of the facial surface of the clinical crown as possible.
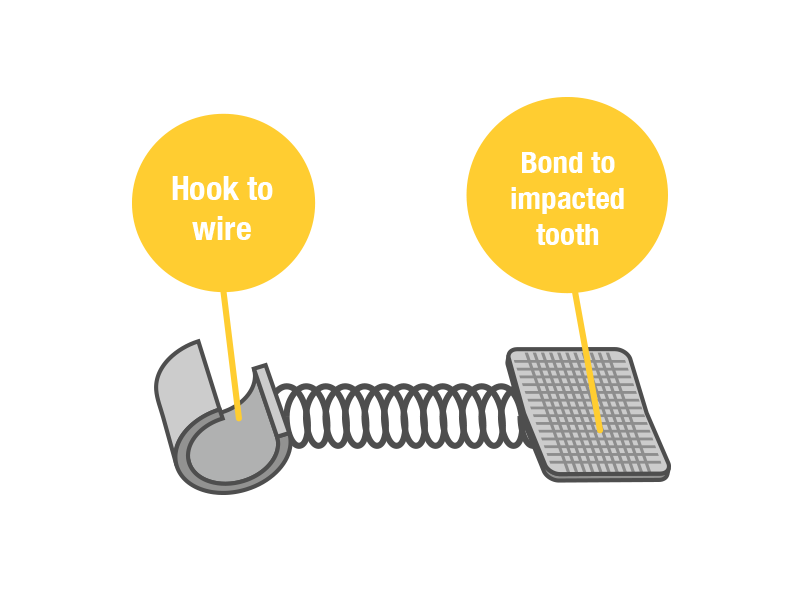
Step 2 – Follow your normal bonding procedure to bond the bracket pad of the Isoglide spring to the tooth. BOND THE PAD WITHIN THE MOST GINGIVAL 1/3 OF THE FACIAL SURFACE OF THE IMPACTED TOOTH TO GIVE THE BEST CHANCE OF BRINGING THE TOOTH INTO THE MOUTH WITHOUT THE NEED TO REACTIVATE THE SPRING. WHEN PLACING ISOGLIDE, ORIENT THE DEVICE SO THAT THE BONDING PAD IS GINGIVAL AND THE CLAMP IS INCISAL ON THE TOOTH BEING BONDED. If the pad cannot be bonded ideally as described, bond the pad as gingivally as possible on the most ideal surface that is accessible.
Step 3 – Gently stretch the spring toward the desired attachment site on the arch wire. Place the clamp on the end of the spring around the wire at this site and fully crimp the clamp closed with a plier. IF YOU DO NOT WANT THE CLAMP TO SLIDE ON THE WIRE, CRUSH IT DOWN FIRMLY WITH A PLIER UNTIL IT CANNOT SLIDE.
Step 4 – Follow your normal procedure for closing the surgical site. The Isoglide spring can be used for both closed and open exposure techniques.
Orthodontist
PLEASE DETERMINE THE DIRECTION THAT YOU WANT THE SPRING FORCE APPLIED TO THE IMPACTED TOOTH AND RELAY SPECIFIC INSTRUCTIONS TO YOUR SURGEON AS TO WHERE THE SPRING CLAMP SHOULD BE ATTACHED TO DELIVER THAT DESIRED FORCE VECTOR.
To help make sure the Isoglide spring has maximum activation, the orthodontist should consider putting an incisal step-down of 4-5mm in the archwire at the site where the spring clamp will be attached BEFORE referring the patient for the exposure surgery. Also consider placing closed coil or rubber tubing at the attachment site of the clamp, as this will make it easier for the surgeon to crimp the clamp in place on the wire without it sliding. Again, if the orthodontist has a specific site to which he or she wants the spring clamp attached, please inform the surgeon of this prior to the exposure surgery.
CLOSED EXPOSURE: When the patient returns for the first orthodontic visit after the impacted tooth has been exposed, the Isoglide spring will already be actively stretched, coming out of the gingiva, and clamped to the arch wire at the desired location by the surgeon. As long as the spring is open and active, there is nothing to be done until the tooth erupts through the gingival tissue and appears in the mouth, at which point the spring may be removed and a normal orthodontic bracket placed.
OPEN EXPOSURE: The Isoglide spring can be bonded to the exposed tooth whenever the orthodontist desires to do so after the open exposure has been completed.
Spring Reactivation
In the unlikely event that the Isoglide spring becomes “bottomed out” and is no longer stretched and active, and the tooth has not yet erupted through the gingiva, the spring will need to be reactivated.
To reactivate the Isoglide spring, follow the following procedure:
Step 1 – Take a steel ligature tie and loop it around the Isoglide spring as close to where it emerges from the gingiva as possible.
Step 2 – Gently pull the ligature tie down toward the desired tie point on the archwire. The spring will slowly stretch out of the ginviga as you pull it down toward the archwire.
Step 3 – Once you have stretched the spring the desired amount, wrap the ligature tie around the archwire and twist it into place to lock it onto the archwire.
Step 4 – Clip off the excess of the ligature tie and tuck in the pigtail that remains.